Saturday, November 28, 2015

Flannel & Lace Scarf

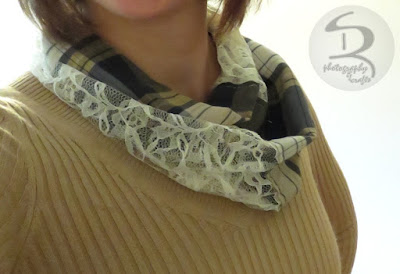
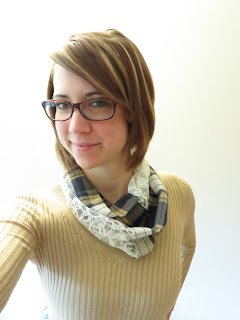
After my last Plaid & Lace Scarf (made from old shirts), I knew I wanted to make another one, but softer and bigger. I looked online and in-store for the perfect materials. Sure, it costs more than hitting up the thrift stores, but I got exactly what I was hoping for!


I bought 2 yards of the flannel fabric at fabric.com. I wanted to make sure I had enough for the length I needed to be able to wrap the scarf. I even have plenty extra that I might make a couple baby blankets with it.


The flannel is so soft and the colors are perfect for fall!
I cut out a piece approximately 9" x 72" to get the size scarf I was wanting.

I found the lacy material at Joann's; it wasn't exactly the 'lace' that I'd had in mind, but when I saw the stitching on it, it matched the plaid so nicely that I couldn't pass it up! Rather than buy another two yards of that, I just stitched two pieces together.


I sewed the flannel and lace into a long tube, gave it one twist, then sewed the ends together. The twist makes it so both materials show once I put the scarf on.

It could not have turned out more perfectly!

Sunday, November 1, 2015

Fall Candle Holders

I'm so excited with how awesome these candle holders turned out!
Last year, my sister decorated some jars with colored rice and un-popped popcorn; I thought it was so pretty and wanted to try it this year.


I started by mixing uncooked, white rice with a couple drops of food coloring and a couple drops of rubbing alcohol. (If you're worried about kids or pets getting into it, I read that white vinegar will also work.) I kept some white rice and made yellow and orange for the traditional candy corn colors. I laid the colored rice out on paper towels to let it dry completely. If you use vinegar, it will need a lot longer dry time; that's why I decided on the alcohol - plus, the rice for this project will be completely sealed off.

I headed to my area dollar store and craft stores to find a perfect, candy-corn-shape container... It ended up being some wine glasses turned upside down - perfect for a candle holder!
For a base, to hold the rice in, I found some round mirrors that were just a bit larger that the glasses, but would work well anyway.


Pouring in the white rice first, then orange, then yellow, I had an upside down candy corn. I used my hot glue gun to glue the mirror on the top of the glass, then was able to turn the glass without any rice falling out.


Originally, I thought I'd leave the mirror visible, but I was a little fussy about the glue showing more that I expected.
Fortunately, I had some silk leaves that I had bought last year and never used, so I added those around the mirror and the ugly glue was hidden! Now I just have to remember not to pick them up from the top, just in case...

I think they turned out stunning! I sprinkled a few acorn and baby pine cones around the leaves to add to the fall look. I absolutely love them! Happy November, Friends.


Wednesday, October 7, 2015

Pumpkin Candy Dish

 Here's a super easy - seriously, less than ten minutes - craft and seasonal decoration!

I found this awesome pumpkin-shaped jar at Michael's. It was in the candle making section, but as soon as I saw it, I knew exactly what I would do with it... 
I walked over to the floral section and found green coil wire, spotted a bag of candy corn near the checkouts, and got in line.

Once I was home, I washed the jar, then wrapped the wire around the top a couple times, leaving several inches on each end. I used a pencil to wrap the ends of the wire around and create spirals - now I had a pumpkin jar to fill with candy! 

I know some of you are judging me right now because, "candy corn is gross." I'll admit though, I enjoy a little sometimes; even if you don't eat candy corn, it's still a cute dish for autumn!
Perhaps, you'd like to fill it with acorns, colored rice or [un-popped] popcorn, or Reese's pieces - any of those are great for fall decorating! If you feel like being more crafty, paint the outside of the jar; then hide whatever you like inside. 

I love how mine looks and would love to see yours, if you make one! 


Thursday, October 1, 2015

Plaid & Lace Scarf

Fall is for scarves and boots... yep.

Although, I like knitting a good fall/winter scarf, this year I was inspired by some plaid/lace and plaid/polka dot scarves I found while browsing Pinterest.

Here's how my first one turned out!


I started out by visiting my area thrift stores, hoping to find some good flannel shirts for cheap and maybe some old lacy shirts, too. While I didn't find any flannel plaid, I didn't leave disappointed.
Just check out these fashionable shirts! (Ok, I honestly, kind of like the second one in... maybe because is actually fits. I might not cut it up after all...)


These prints are gonna be great for fall! 
(Can you see the detail on the navy blue one? It's got little stitched in dots.)


After having finished the first scarf, I know that I definitely want to make the next ones bigger. The shirts might have enough material, but I think I'll check out Joann's for some real flannel and more lace!

Still, from 80's shirts to today's scarf... I'm happy with it!

Wednesday, September 23, 2015

Autumn Wreath


I know I've proclaimed my love for the fall season numerous times, but every year I just get so excited for it! This year, the warm weather seems to be holding out... still, today it's officially fall and I was ready to get some decorations out.


A couple years ago, I made my first wreath and blogged about it here.   [In fact, it was two years ago, yesterday, and my first blog post! Happy two year anniversary saruthdesigns!]   Well, that wreath got me through two fall seasons, but when I took it down last year, it was definitely weathered.

This year, I got to make a new wreath and I was super excited about it! I don't remember where I found it (a thrift store, probably), but I had this huge grapevine wreath (you could always purchase them at Joann's) that I couldn't wait to decorate with silk leaves and sunflowers. I went out to my local Joann store and bought a few more silk sunflowers and the beautiful burlap ribbon to make a bow with.


The wreath was so gorgeous with just the leaves and sunflowers tied in!

I debated for a bit whether to add a bow or not, but in the end, I loved the ribbon so much that I had to make one.
I tried several different ways of making a bow before I realized that it's really so much easier to just cut the pieces and glue them - you get the perfect bow every time.
  

I was pleased with how the bow turned out, definitely adding to the eye appeal of the wreath as a whole. I added in a few more strands of ribbon to bring it all together.

Happy Fall Y'all!


Thursday, September 3, 2015

Refurbished Bed Frame

For the past several years, I've been sleeping on a mattress and box-springs just laid on the floor... I figured it was time to grow up a little more and get a bed frame. Lucky for me, my dad had an old frame that he didn't want anymore!

I wanted to paint it over with a white-shade, but not too bright; my bedroom is tones of grey, with citron green, white, and black accents. Even the photos on the walls are printed in black-and-white to match.
Who knew there were so many "shades" of white to chose from at the paint store?! I was not going to look them all over, so when I found one called Gray Shimmer, I was sold.
I'm really not sure why it's called that because it isn't really grey or shimmery at all; but I like it.
   

After about three coats and two days of dry-time in my basement,
I was ready to put it together and get my new bed set on!

I think the color is perfect! (Although, when I first saw it next to the off-white walls, I thought the walls looked filthy.) Once everything was made up, I don't think the color difference is noticeable.


And I'm loving my new bedroom!
Yay for being more adult!


Monday, August 10, 2015

Container Gardening: Peppers

I just wanted to take this blog to show off my fabulous container garden, following specifically the life of the pepper plants, from this summer.
(These photos are also on my Facebook page at www.facebook.com/srdphotographs, or by following the post below. Feel free to like, comment, and share the photos!)

container gardening over the years
Posted by SRD photography on Monday, May 12, 2014


May 27 - Re-potting the plants I purchased from Early Bird Farm.

June 12 - Already so many little peppers!

June 21 - Growing fast.

July 21 - Finally starting to change color!

July 28 - Just about ripe.

August 6 - First pepper harvest; ready to eat!!

And more to come! I absolutely love growing my own food.


Sunday, June 28, 2015

"Float On" Painted Canvas


Have you ever heard of the stages of change? If not, read about it by following the link, or view a quick image explanation here. I started this in February, when I was starting to think about some changes that I needed to make, and I finally completed it after I had put the changes into motion. This is a piece of art that I created that has a lot of personal meaning for me. While I was going through my own stages of change, these lyrics from "Float On" by Modest Mouse were a good reminder. We will, everything will, float on alright.

The song came on my mp3 player as I was driving one day, and every time it plays I think, "I really like this song!" I thought it would be fun to make something to represent it. I decided that a hot air balloon was a good representation of floating, being at peace in the clouds, knowing that the world keeps turning no matter what we are doing.
Rather than searching Google for an image of a hot air balloon without a copyright, I tried my hand at sketching one. Then scanned it into my computer to add the text where I wanted.

I had an 8x8 inch canvas which would be perfect for a standard size paper. I printed a flipped version of my image so that I could trace the lines with pencil and press it onto the canvas.


Then it was simple tracing with a paint marker and "coloring" inside the lines with acrylic paint.

I added the cloud at the end, because it needed something else to 'balance' it; and a cloud is also a peaceful representation of floating on.
I love how this piece is reflective of choices that I made in my life. I was finally able to finish it and be at peace with the changes that I
had decided to make.

If you have decisions to make, that you have been putting off, remember that change is
a necessary part of life (usually for the better) and we will all keep floating on.


Sunday, February 8, 2015

Valentine's Crafts

Normally, I'm not the pink & purple, hearts, and glitter kind of girl; but lately, it's been growing on me. I keep seeing pretty little decor for Valentine's day and going, "oooh, I like that!" So, even though I don't normally decorate or do much for February 14th, here are a couple crafts that I just had to make this year...
"Love" canvas art and "Love Birds" photo holder.


"Love" Canvas Art

You've probably seen a lot of canvases with letter stickers put on them and painted over -
they are cute and look so easy!
Well, naturally I had to make this a little different with colored letters and a white top coat of paint.

First, I started with a 12x12 inch white canvas and used acrylic paints (that I had bought forever ago and hadn't opened yet) to create abstract streaks of colors. I used the obvious "Valentine" colors, then added in some teal because I keep seeing teal and gold together and love it!

After letting the paint dry overnight, I cut out a paper heart to the size that I wanted and set it on the canvas so that I knew where to place the stickers. Lucky for me, when I went to buy stickers, there were a few sheets on clearance (stickers can be expensive!).
Even though I had enough of the four letters I needed, I wanted each "love" word to look a little different. I got creative with the other letters and numbers, using parts of a "Z", "h", "0", and "3". (Can you find them?)

It took some firm pressing to keep some of the stickers down before I started to paint over the whole canvas with white. I'm not the most patient person and brushed the paint on a bit too rough. One sticker came up and I had to wipe up the wet paint to make sure some color was still showing.
*Make sure you are gentle when applying the paint over the stickers, or it will get under them or lift them up.
I had to let it dry and paint a second coat to get it really white.
Then, I used an extra pair of tweezers to lift the stickers off while the paint was still tacky.

Next, once the canvas was completely dry, I outlined the heart area where I wanted all the gold glitter. I used a paint brush to apply glue and sprinkled lots of glitter on top. I mixed some glitter and glue together and brushed it over the rest of the canvas to create some extra sparkle.

Lastly, I sprayed over the whole canvas with a high-gloss spray; this helped to hide some of the brush strokes and smoothed out the letters.

This craft would be just as nice on a wood block or as a pallet art project!
Use lyrics from your favorite love song or add an anniversary date to make it extra special. Mine makes me think of the Beatles song lyrics.


"Love Birds" Photo Holder

This is the easier of the two crafts - that is, if you have the right size wood block lying around; I happened to have this piece that I just had to saw about four inches off. If you don't have any wood handy, you can probably find some nice shapes and sizes at your craft store; or head over to the hardware store and ask them to cut a piece for you.

I had the "love birds" fabric left over from some baby burp cloths that I'd made for my cousin last year, and thought it was perfect for Valentine's decor too! I aligned it just so to get the hearts and birds where you could still see them around the picture, then cut the fabric slightly smaller than the wood piece. Using ModPodge (that I found at the Dollar Store!), I glued the fabric down and applied another layer over the top.
The ModPodge dried overnight; I glued on the mini clothespin and went to work. When I got home, the photo holder was ready for display!

Instead of fabric, you could use scrapbook paper, newspaper or a magazine page, or even just paint the block!

This was another photocraft that I kept seeing and just had to try out. Are you ready to make your own now? What are some craft projects that you've been wanting to do?

Even if you aren't the type to care much for Valentine's Day, I hope you all feel lots of love this year!


Thursday, January 22, 2015

Knit Scarf #3

So, I started this scarf back in October...
I know I've mentioned before about how long I can take to finish a project. This time, though, I wanted to try something other than a straight knit scarf (see the others I've made
here and here); and I wanted to make a real infinity scarf.


I found two beautiful skeins of yarn at my local Thrift Store for only 50¢ each! Since I'd already started thinking about knitting an infinity scarf, I couldn't resist the rich colors.

It's kind of funny how people relate knitting to Grandmas, but the more I talk about knitting, the more I find out my own friends knit! In fact, I got this idea in my head from a friend.
She was wearing a gorgeous, red scarf that I loved; after expressing my thoughts, she stated she knit it herself. I exclaimed how beautiful the ribbing was and she shrugged saying, "It's just knit 2, purl 2."

I had to watch a lot of YouTube videos to teach myself a bit more about knitting! I discovered that I had been doing a purl stitch very incorrectly - no wonder I had avoided it for so long - it really wasn't nearly as difficult as I had thought.

The yarn I had bought is a very fluffy, curly yarn and I couldn't see the results quickly to tell if I was knitting the rows correctly. I decided to just practice the ribbing on some regular yarn first, til I was confident.

Then I was distracted by other knitting tutorials on YouTube... and I practiced knitting a cable - 


This was all in the first night of starting my infinity scarf and I was determined to see the ribbing on the scarf before I went to bed. It took several rows and monotonous counting ("knit 2, purl 2, knit 2, purl 2...") until I saw that it was definitely ribbing. I was so excited that I shared this photo on Facebook -                               

Over the next couple days, I added in the second color, watched videos on how to carry up the color (so that I wasn't knotting it and cutting every time I switched back), and thought it was looking great!

For a couple weeks, I knit several rows a day, while watching movies or TV shows; but once I started decorating for the holidays, the needles and yarn moved into my craft room for hibernation.

Finally, I pulled the project back out and sat down to finish it! I bought another skein of the purple with a Christmas gift card I'd received; so I'm still saying this is my dollar scarf!


It's so soft and warm and comfy! I've worn it several times already - and needed it with the below zero temperatures we've had with wind chill!

I discovered a co-worker knitting something the other day during lunch break. When I asked, she said she was just starting a sweater!
We talked about knitting for a while and she left me with this, "Eventually, you'll get sick of doing just scarves and want to try something more challenging."
I can't say I'm quite there, but I did see a beautiful knit blanket on Pinterest that I see myself starting in the near future.

And you'll see a few new patterns I've pinned, if you check out my Pinterest board "Knit It!"
Follow Ruth's board Knit It! on Pinterest.

Thanks for reading!


Wednesday, January 7, 2015

Cold Weather Dinners

Today is a very cold day where I live, single digits with a windchill on top. Brr!
Even though I don't love the cold, it's the prefect time for some great "warm-me-up" meals. So, I thought I'd share a few that I've made since the weather turned chilly.

Scalloped Potatoes and Ham - a favorite Wegmans' recipe found here.
     I should probably let you know right off the bat that these aren't "healthy" dinners, per say... this scalloped potatoes recipe uses a full quart of heavy cream! I'm sure there are lots of healthier recipes out there, but this one is so creamy and delicious that I can't turn it down.
     Even though the recipe doesn't call for it, I always add the ham.
     I like to pair it with green beans; and always a piece of peanut buttered bread - it's something my Mom always did.


Zuppa Toscana Soup - an Olive Garden copycat recipe found here.
     Ok, if you're on a diet then you might not like this post very much, because this recipe uses heavy whipping cream; but only a cup for a whole pot of soup...
     Rather than dicing the potatoes like Siggy Spice, I followed my sister's recommendation to slice them (she used to work at Olive Garden). She also said she usually omits the bacon - I know, "bacon makes everything better" right? But in this case, my Facebook friends and I agreed that it would be better without bacon.
     Finally, I decided to use a mild Italian sausage (since I don't usually like it hot) and it was perfect!
     I paired it with some warm, homemade bread.


Meatloaf and Mac&Cheese - these are homemade recipes that I haven't figured out exact measurements for, I usually just mix as I go... But I'll do my best to write it down for you below the photo.

For the 'base' of my meatloaf I follow the recipe in my Better Homes and Gardens cookbook; also found here - 2 eggs, 3/4 cup milk, 2/3 cup bread crumbs, and 1 1/2 lbs. ground beef.
After that, I add whatever I have that sounds good - seasonings, onions, carrots, bacon, etc.
Bake in a bread pan at 350° F until internal temperature reaches 160° F. When it's almost done (maybe 10 minutes left), I add ketchup and/or barbecue sauce to the top.

Homemade Mac&Cheese (the way my Dad likes to make it):
     Step 1 - Choose your favorite pasta noodle and cook about 8 oz. to your preferred done-ness.
                Drain and rinse with cold water, or mix a little butter in; set aside.
     Step 2 - Pour about a cup of milk into a  medium sauce pan; add about 4 tablespoons (half a stick) of butter; salt and pepper to taste; and, if you like, a bit of garlic powder and dried parsley.
                Heat on low-med until just boiling; reduce to low heat.
                Stir in 6-8 oz. of Sharp Cheddar Cheese one handful at a time; continue stirring until melted. (The mix as you go applies here. You may want your cheese mix creamier or thicker, so add milk and butter to thin or add cheese to thicken. Just remember to only add small amounts and stir continuously.)
     Step 3 - Combine pasta and cheese sauce, then pour into baking dish.
                Bake at 350° F for approximately 30 minutes.

And for the new recipe in the picture Sweet Potatoes & Pears! I found this recipe in a Redbook magazine that I get monthly (not sure how, because I never ordered it and no one has admitted buying it for me; but it's got my name and address on the label and I'm not complaining). Since I can't find it on their site, you can see it on my Pinterest board here. I also might have added a couple tablespoons of brown sugar to mine - yummy!


 Chicken Pot Pie - an "impossibly easy" Betty Crocker recipe found here.
     I mean, really, this recipe is a no-brainer. Grab a can of cream of whatever soup (or I used sausage gravy!), pick your veggies (whether fresh or frozen), add some cooked chicken, and pour the baking mix on top. I love how easy and tasty it is!


Thanks for checking things out - I hope these recipes help keep you a little warmer this winter!