Wednesday, August 27, 2014

Cake Decorating

I've gotten a lot of use out of my cake decorating skills this summer! Starting with my own birthday cake, I've also made cupcakes for my nephew's first birthday, my sister-in-law's wedding shower, and my sister's birthday! In the next two months, I'll be making a practice run and the actual wedding cake for my brother's wedding. It's nice to enjoy something like cake decorating.


I started learning cake decorating when I got a job with Wegmans' Bakery in 2008. It is definitely a skill that takes a lot of practice and for a while, I wasn't sure I was going to be able to make roses.
Once I became more familiar with decorating, I really started loving it.
The first cake I made outside of work was for my brother's graduation party in 2009 - the same brother whose wedding cake I'll be making in October. Since then, I've make a lot of cakes for special occasions, or just because. Pictured are some of my favorites.

With all the summer heat, cake icing tends to melt, fast. I had wanted to make a tiered cake for my birthday from an idea I saw on Pinterest (of course); however, not having air conditioning, the icing between the layers was too soft and made the cake slide. I ended up making this cake instead and it was still beautiful.


For the rest of the summer events we had planned, I decided to make some fun and fancy cupcakes.
I don't have a step-by-step pictorial, but I'll share what tips to use and a couple links that I found helpful. If you've never worked with decorating tips or just want more instructions, check out wilton.comYou can also check out my Pinterest board for lots of links.


Interestingly enough, the cupcakes, in order of each event, also go up in level of difficulty.

Nephew's 1st Birthday Sunshine Cake

This sunshine cake was made with a 9" round pan and regular sized cupcakes.
To make the cupcake icing swirl with colors, I divided red, orange, and yellow icing into the decorating bag.
(Icing cupcakes - http://www.wilton.com/technique/1M-Swirl)
I used a small star tip to make the 1 on the cake.


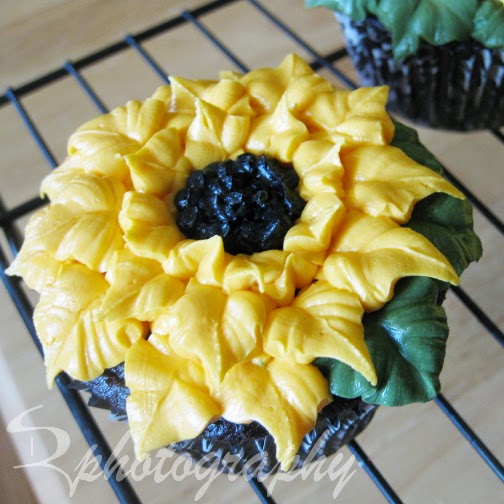
Tea Party Wedding Shower Flower Cupcakes

Lots of pretty flower cupcakes are perfect for an outdoor tea party!

I used my large rose tip #125 for the roses and the poppies, a leaf tip (#366 or cut the bag to look similar) for the sunflowers, and a 2D star tip for the hydrangeas.

Click here for the rose technique - instead of icing on the nail, pipe the rose right onto the cupcake.

I followed Martha Stewart's technique for the poppies; again, just piping right onto the cupcake. (I did not refrigerate them.)

To make sunflowers, use the leaf tip and work your way from the outside; creating smaller circles and petals.

Here is a great pictorial on how to do the hydrangeas. It also has a picture for mixing colors in a bag (like I did for the sunshine cupcakes).


Alice in Wonderland Birthday "Painting the Roses Red" Cupcakes

My sister has always loved "Alice in Wonderland" and the thought of doing a themed party. For her 30th birthday this year she finally planned the theme. She asked if I would be able to make cupcakes with white roses that looked like they have been painted red.
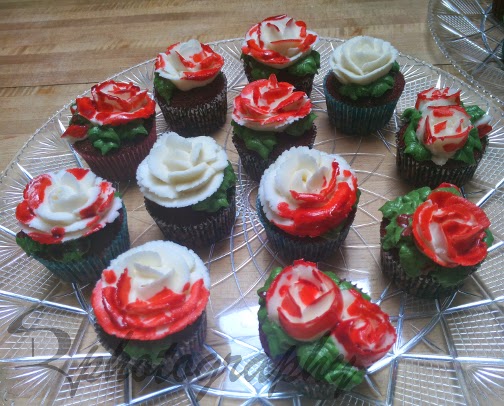
I figured that I could actually paint the red coloring onto a white rose for the effect, but it took a little experimenting. The icing for these roses had to be quite a bit thicker so that the flower stood up better and didn't 'wilt' when I put the paintbrush to it. The bright red coloring had to be watered down a little to help it spread better on the icing. And the combination actually made the roses still look wet - but watch out! it will stain if it gets on anything!

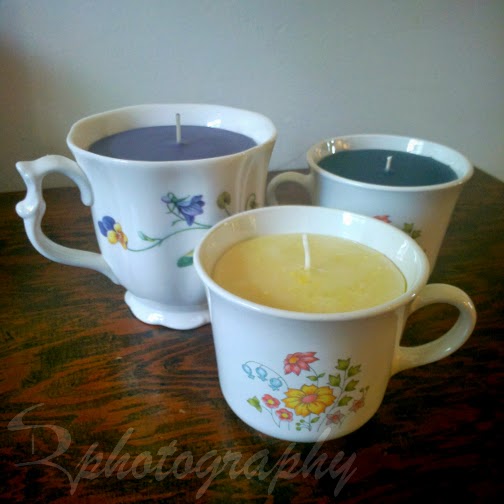
**Side note: remember the teacup candles that I made in July? I made some whimsical teacup candles to go with the Alice in Wonderland theme:


It's definitely been a fun and eventful summer. Now that it's winding down, I'm ready for fall - cooler weather, gorgeous colors, and pumpkin everything!
Don't forget to come back to see the wedding cake in October.


photo taken, at my request, by my sister; edited by me.

Friday, August 22, 2014

Wooden Pallet Sign

I may be a little behind with the wooden pallet trend, but I'm still happy to have made my first pallet sign.

I had seen so many beautiful ideas on Pinterest and knew I wanted to make one, but first to get some pallets, and second to put an image and a quote together...


If you think making a pallet sign is going to be easy, think again - taking the slats off took a lot of strength! Now if I had a saw to cut through the nails, it may have been different, but I was hammering at the wood to force the nails back out.
I was able to obtain a smaller than average pallet, the slats measuring about 28.5" by 3.5". I didn't want as much gap between the slats, so I had to take it all apart and put it back together. I might add that I'm all arms and legs, without much muscle, but I like to be able to do things myself. And, for this one, I didn't ask for any help - and only broke one slat!
After it was apart, I attempted to sand the edges and rough spots. Pallet wood seems to be extra rough and untreated, it's like the wood that isn't good for anything else. I by no means got the wood smooth, but it was somewhat nicer than before sanding.
Next, I nailed the pallet back together, closer, using the same nail holes that were already there; and started drawing on the sun and rays. I used a very large plant pot to get a perfect arc and used the straight edge of the broken slat for the rays.
I used a pencil to draw the lines, thinking that the paint would cover it; however, if you are more of a perfectionist than I am, you will want to be very light with the pencil and/or erase it as you go. If I look very closely at my finished art, I can see the pencil lines.
Before beginning to paint, I spackled over the nails to help hide them and let it dry overnight. I couldn't wait to get up and start painting the next day!

I did two coats of paint on everything, which took a couple days with having to go to my real job and all, but I wanted vibrant color!

Figuring out how to the the letters on took some thinking - I don't trust my freehand and I wanted some different fonts. I had seen a lot blogs on transferring ink to wood by printing the lettering backwards, then wetting it to force the ink back out onto the wood. That was all on unpainted wood and mine had to go over the paint, so I didn't think that would work. I resorted to cutting out and tracing the letters.
A steady hand and patience gets the letter painting done; I definitely had to take breaks because I kept going cross-eyed with the closeup work. Again, I did two coats of paint.
Now I could have been done; the sign was beautiful, bright, and cheery - just what I need for first thing in the morning. I love the 'weathered' look though, so I got the sandpaper out again and roughed up the painted edges and scratched out some of the letters.
Finally, I need to add something to be able to hang it on the wall. I found these hooks and Michael's and thought they would work well - this pallet sign is pretty heavy!
I thought I'd need to get my dad's help to hang it, but he's pretty busy getting ready for the school year to start. I went over to see what I'd need and he gave me some dry wall anchors. I drilled some holes and got it hung all by myself!

I'm so excited to have this hanging in my craft room - "be awesome" - not just about personality, I think it fits for crafting too. I'll have it on the wall right next to my work clothes closet, so every morning when I 'zombie-walk' into the room to get dressed, I'll see the bright colors and have a nice reminder to start my day.

Another thing that I love about this is that it could be a great hand-me-down for my nephew someday!


Tuesday, August 12, 2014

Black & White Photo Mat


(at least I do [most of] the things I pin)


I had this in mind to make probably as soon as my nephew was born. I loved the idea on pinterest and thought it would be absolutely perfect to make up the mat of pictures from his first year and the main picture from his first birthday.
I made the collage of black and white photos around the colored 5x7 photo using a photo editing program called GIMP (which you can download for free here) It is supposedly similar to Photoshop and definitely takes some learning and getting used to.
I wanted to be able to print it all out as an 11x14 picture, rather than trying to cut out and glue pictures onto a mat. (By the way, my sister made the invitation; she's also quite crafty - she makes beautiful scrap books.)
I also made an 8x10 version with different cake smash photos for 'Mama and Dada' and for 'Grandpa'. The pictures on the mat are all in a line rather than overlapping as they do in 11x14.

The photo collage is a great way to display favorite photos without framing them all.
It's definitely a project worth playing with and a wonderful gift!


Saturday, August 9, 2014

Picture Frame Makeover

Just a quick post to show off this picture frame that I have finally finished!

When I moved into my apartment, two years ago, I printed these photos of mine and had the frame that I needed to repaint. It was previously red and not an easy task to cover.

I began my first attempt at covering the red the same week I moved in, The wood of the frame must have been treated. The red was glossy and the paint wasn't sticking. Two coats wasn't enough. And as soon as I peeled the painter's tape off one color it pulled all the paint with it.

I washed (literally, washed in my bathtub) the whole frame and tried another approach - sand the red off until I got to the bare wood. I think the wood was soaked in glossy red evil. I sanded and sanded, but didn't see much of a difference.

To give you an idea, here's the back of the frame - sorry, I didn't take photos throughout the process.


Frustrated, I walked away from the project; and almost two years later, it was still in my basement.

I decided to give it one more try and if the paint still peeled, I would toss the frame and buy a new one. But a happy day for me, the paint stuck and it looked just the way I had imagined!

Some projects get lost for a while, but they're always satisfying to see completed!