Showing posts with label cake. Show all posts

Tuesday, October 14, 2014

Wedding Cake

When my brother got engaged, he and his fiancee knew they had some fast planning to do - about 6 months! They were fine with a simple wedding and small reception. They asked me if I would make them a cake just so they had something to cut - not big enough for the 100 or so guests. I had made a tiered cake last year for my sister's baby shower, so I figured I could do the same size for the wedding.

As promised, I'm now sharing the pictures --
It took us a while to all agree on something. She wanted sunflowers, but for it to all be edible (so no real or silk flowers on the cake). He wanted didn't want anything too elegant, but with swirls or paisley that would go with the print on the groomsmen's vests. It had to be a two-layer round cake (because that's what I had the pans for). We pinned and reviewed a lot of wedding cake pictures.

About a month before the wedding, I did a practice run (picture at the top). I just baked two 6 inch rounds and did what the top layer of the cake would look like.
I certainly can't make two identical cakes, and I hate to say it, but I liked the practice cake quite a bit better than the final cake. Although, everyone at the wedding saw only the final cake and I received many compliments. The final cake was still very pretty.

I used two layers of 9 inch cakes and two layers or 6 inch cakes, all chocolate as per the bride's request.
I don't make cakes from scratch very often; a box mix works and tastes just fine to me. The icing was also purchased from a store. (Normally, I would make my own icing, but I wanted a little more time and less stress.)


I've never worked with fondant, so I wasn't going to start now. However, it takes a lot of practice and patience to get icing smooth and I wanted it as smooth as could get it. And when I'm icing a cake, I have to remember that a lot of things will be covered by the decorations on the cake and even if they aren't covered, as a whole, most of the 'less smooth' areas won't be noticeable by anyone other than me.
I iced the tiers separately, each with a cardboard base; then I [carefully] plopped the top layer on.
My sister asked me how long from start to finish the cake would take me, trying to get an idea of why special cakes cost as much as they do -- I estimated 4 hours. With the cake mixing, baking, cooling, cutting the tops flat, color mixing, and decorating, I think it took me longer than that. The decorating alone (after what you see in the picture above) took a little over two hours. A professional, or someone who makes special cakes a lot more often than I do, would probably be quite a bit faster.
But it all paid off (no pun intended, the cake was a gift from me).


And they loved it too --

For my baby brother and his wife:

all my love and best wishes for a marriage that is

as beautiful and happy as your wedding day!


Wednesday, August 27, 2014

Cake Decorating

I've gotten a lot of use out of my cake decorating skills this summer! Starting with my own birthday cake, I've also made cupcakes for my nephew's first birthday, my sister-in-law's wedding shower, and my sister's birthday! In the next two months, I'll be making a practice run and the actual wedding cake for my brother's wedding. It's nice to enjoy something like cake decorating.


I started learning cake decorating when I got a job with Wegmans' Bakery in 2008. It is definitely a skill that takes a lot of practice and for a while, I wasn't sure I was going to be able to make roses.
Once I became more familiar with decorating, I really started loving it.
The first cake I made outside of work was for my brother's graduation party in 2009 - the same brother whose wedding cake I'll be making in October. Since then, I've make a lot of cakes for special occasions, or just because. Pictured are some of my favorites.

With all the summer heat, cake icing tends to melt, fast. I had wanted to make a tiered cake for my birthday from an idea I saw on Pinterest (of course); however, not having air conditioning, the icing between the layers was too soft and made the cake slide. I ended up making this cake instead and it was still beautiful.


For the rest of the summer events we had planned, I decided to make some fun and fancy cupcakes.
I don't have a step-by-step pictorial, but I'll share what tips to use and a couple links that I found helpful. If you've never worked with decorating tips or just want more instructions, check out wilton.comYou can also check out my Pinterest board for lots of links.


Interestingly enough, the cupcakes, in order of each event, also go up in level of difficulty.

Nephew's 1st Birthday Sunshine Cake

This sunshine cake was made with a 9" round pan and regular sized cupcakes.
To make the cupcake icing swirl with colors, I divided red, orange, and yellow icing into the decorating bag.
(Icing cupcakes - http://www.wilton.com/technique/1M-Swirl)
I used a small star tip to make the 1 on the cake.


Tea Party Wedding Shower Flower Cupcakes

Lots of pretty flower cupcakes are perfect for an outdoor tea party!

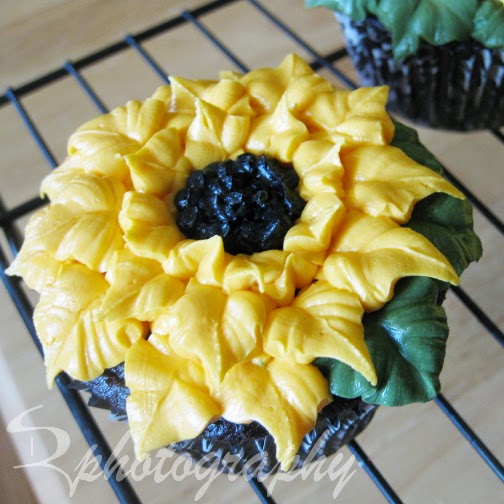
I used my large rose tip #125 for the roses and the poppies, a leaf tip (#366 or cut the bag to look similar) for the sunflowers, and a 2D star tip for the hydrangeas.

Click here for the rose technique - instead of icing on the nail, pipe the rose right onto the cupcake.

I followed Martha Stewart's technique for the poppies; again, just piping right onto the cupcake. (I did not refrigerate them.)

To make sunflowers, use the leaf tip and work your way from the outside; creating smaller circles and petals.

Here is a great pictorial on how to do the hydrangeas. It also has a picture for mixing colors in a bag (like I did for the sunshine cupcakes).


Alice in Wonderland Birthday "Painting the Roses Red" Cupcakes

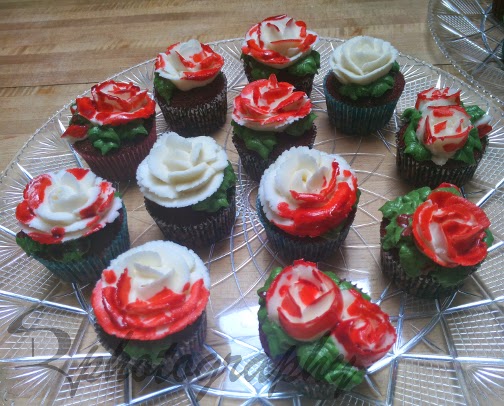
My sister has always loved "Alice in Wonderland" and the thought of doing a themed party. For her 30th birthday this year she finally planned the theme. She asked if I would be able to make cupcakes with white roses that looked like they have been painted red.
I figured that I could actually paint the red coloring onto a white rose for the effect, but it took a little experimenting. The icing for these roses had to be quite a bit thicker so that the flower stood up better and didn't 'wilt' when I put the paintbrush to it. The bright red coloring had to be watered down a little to help it spread better on the icing. And the combination actually made the roses still look wet - but watch out! it will stain if it gets on anything!

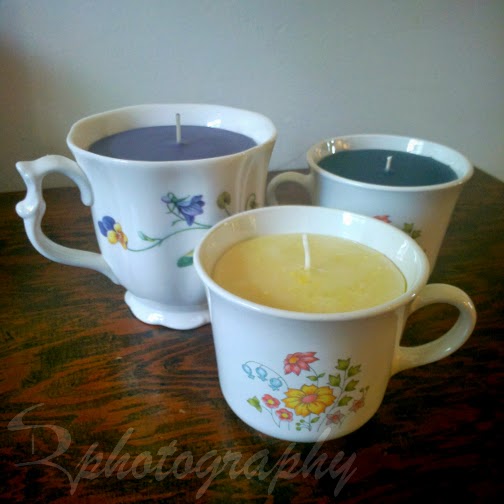
**Side note: remember the teacup candles that I made in July? I made some whimsical teacup candles to go with the Alice in Wonderland theme:


It's definitely been a fun and eventful summer. Now that it's winding down, I'm ready for fall - cooler weather, gorgeous colors, and pumpkin everything!
Don't forget to come back to see the wedding cake in October.


photo taken, at my request, by my sister; edited by me.

Sunday, October 6, 2013

Perfectly Pumpkin Cake

Fall-time means pumpkin everything and this is one of my favorite recipes!

Pumpkin Cake with Cream Cheese Icing

I find that one of the best things about cooler weather is being able to heat up the house with baking - and, of course, it smells great too! I made this cake one year for my Dad's birthday and it was a hit! (It was also the first cake I made completely from scratch.) As usual, I changed a few things to make it my own.

Pumpkin Cake
     2 c. all purpose flour
     2 c. sugar
     2 tsp. baking soda
     2 tsp. cinnamon
     1/2 tsp. salt
     4 eggs
     1 c. vegetable oil
     2 c. canned pumpkin
     1-2 c. chocolate chips

Combine flour, sugar, baking soda, cinnamon, and salt in a large mixing bowl; stir lightly. Add eggs, oil, and pumpkin. Beat with an electric mixer until thoroughly blended. Mix in chocolate chips.

Pour batter into a buttered and floured pan(s). 
Bake at 350°F for 30 to 40 minutes, or until cake tests done. Cool while preparing Cream Cheese Icing.

Cream Cheese Icing
     1/2 c. butter, softened

     1 (8 oz.) pkg. cream cheese, softened
     2 tsp. vanilla extract
     powdered sugar (about 1 lb.)

Combine butter and cream cheese in a mixing bowl. Beat with an electric mixer until smooth. Mix in vanilla. Add cupfuls of powdered sugar and blend slowly until desired consistency. 
Spread on cooled cake. Sprinkle with crushed walnuts (if desired).


Of course, you could really add several different ingredients to this cake to suit your taste buds. Instead of chocolate chips try raisins or cranberries, or a combination. I chose to put walnuts on the icing (because it's easier to scrape off for those who don't enjoy them), but they would be just as good mixed in with the cake batter - or try pecans. And if you don't like any of those, a plain pumpkin cake with cream cheese icing is still delicious!
So, if you have the extra time, I highly recommend making this pumpkin cake. Then, slice yourself a piece, relax, and enjoy!


Note: The original recipe that I followed can be found at cooks.com or by clicking the link in this entry's header.