Showing posts with label gifts. Show all posts

Tuesday, December 16, 2014

Candy & Ribbon Wreath


I love making these candy wreaths! They make quick, adorable gifts that also show you put a little thought and care into it. 

For the past few years, I've made one for my Dad to take to his school (he's a principal and teacher). I thought it would make a fun addition to his office during the holidays - other teachers could stop by and have a little treat and the students might feel a little more at ease in the principal's office with a piece of candy! 

Last year, I shared several photos of the candy wreaths I've made; without a pictorial. This year, I made the wreath an easier way and want to share it again - with step-by-step pictures.


To make this fun candy & ribbon wreath you'll need:

8"-9" round base
(you can buy it or make it with a wire hanger)


3-4 pounds of twist-wrapped candy

curling ribbon


To get started, cut several pieces of ribbon at 12-14 inches each.
Step 1 - tie the ribbon to one side of the candy piece
Step 2 - double-knot the ribbon and candy to the wreath's base
Step 3 - curl the ends of the ribbon using scissors
Step 4 - push the candy pieces together
Continue these steps, until you have a nice full wreath.


In my post last year (see it here for other wreath ideas), I said that I used floral wire to wrap the candy around the base, but that I had found a few other tutorials that I wanted to try. This is one of them and it's definitely faster and easier! The floral wire, after a while, would dig into my fingers and make them sore so that I couldn't make a whole wreath in one sitting. This method, using ribbon, took under three hours and no pain. It also uses less candy (making it lighter) because the ribbon curls make it look full faster.

To finish, I added a colorful bow and it's ready for gifting!


With all the fun ribbon curls, I'm thinking this could also make an excellent year-round wreath - summer parties with bright orange and yellow ribbons; birthday presents with his/her favorite colors and candies; or maybe a Halloween wreath with orange and black.

Whatever the occasion, a candy & ribbon wreath will brighten anyone's day.


Sunday, November 30, 2014

Ribbon Christmas Tree Towels

Remember the Ribbon Egg Towels I made back in March? I had said that I planned on making some with Christmas trees, but didn't want to think about winter just then. Well, winter is here and Christmas is just around the corner! These beautiful towels make great decorations, or great gifts!


This picture shows them in order of how I made them - First, I started by using the same process as with the Egg Towels, but working with thinner ribbon made it harder to work with the fusing tape. For the last two towels I tried the following method and loved how they turned out.

Here's what you'll need:

  • Towels
  • Ribbons
  • Heat-n-bond
  • Iron
  • Wax Paper
  • Scissors/Rotor Cutter


First, pick out the ribbons and the order that you want them for your tree, then cut them to about 5 inches. If you want a larger tree, more than 12 or so ribbons, you'll need to cut them longer.


Step 1
- lay the ribbons backside up on a piece of wax paper on your ironing surface. The Heat-n-Bond then gets applied. The wax paper allows the Heat-n-Bond to stick to something other than your ironing board or iron and is easy to peel off.

Step 2 - now you'll have a square of ribbons and you want to cut out the tree shape  
Step 3 - peel off the backing of the Heat-n-Bond. You should have a single piece with all the ribbons on it.
Step 4 - lay the ribbon piece right-side up on the towel where you want it adhered. Place a new sheet of wax paper over the top and iron-on. The wax paper this time, will lift off the extra Heat-n-Bond so that the towel is just lined with beautiful ribbons.


Lastly, I added a quick stitching of trim to the bottom of the towel to give it a little more holiday color.


So, what do you think - do you have some extra ribbon around to make your own?
These would make great gifts too!

Did you have a favorite style - 
the more boxed look of the first towel? no trim at the bottom of the second towel?

However you decide to make one, it will be beautiful!
Let me know how it turns out by leaving a comment or photo below!


Tuesday, August 12, 2014

Black & White Photo Mat


(at least I do [most of] the things I pin)


I had this in mind to make probably as soon as my nephew was born. I loved the idea on pinterest and thought it would be absolutely perfect to make up the mat of pictures from his first year and the main picture from his first birthday.
I made the collage of black and white photos around the colored 5x7 photo using a photo editing program called GIMP (which you can download for free here) It is supposedly similar to Photoshop and definitely takes some learning and getting used to.
I wanted to be able to print it all out as an 11x14 picture, rather than trying to cut out and glue pictures onto a mat. (By the way, my sister made the invitation; she's also quite crafty - she makes beautiful scrap books.)
I also made an 8x10 version with different cake smash photos for 'Mama and Dada' and for 'Grandpa'. The pictures on the mat are all in a line rather than overlapping as they do in 11x14.

The photo collage is a great way to display favorite photos without framing them all.
It's definitely a project worth playing with and a wonderful gift!


Tuesday, July 8, 2014

Teacups and Wedding Shower

This past Sunday was my future sister-in-law's wedding shower. I may have mentioned before that I am the second of five kids - three girls, then two boys. The sister younger than me was married 4 years ago, and she hosted this shower for our youngest brother's fiancé.
She planned an outside 'tea party' at her home - we could not have asked for more perfect weather!
My sister is an excellent planner, organizer, list-maker, etc. I do not have as much patience for that, but I wanted to help where I could. I volunteered to make the cake (which turned in to cupcakes) and to make some gift prizes for the games - candles or succulents in teacups - ideas that we had discovered on Pinterest. (Pinterest is such an amazing thing to have now for any kind of event planning. Just type in one word of what your theme is and you'll find thousands of ideas that other people have already used for a similar event - easy planning!)
First, I had to find some teacups! Thrift stores are wonderful for these kinds of purchases (although, I like a good thrift store find whatever it is). I found all of the pretty teacups for around 25¢ each.
The candles I started making a while before the shower, but the I waited for a couple days before the shower to make plant the succulents. While they are super pretty, I wasn't sure how well they would last in a teacup; and I didn't want to try to keep them alive for too long.
I bought a variety of small plants and most of them were the perfect size for one to a teacup; and the guests loved them too!
  
The candles were easy to make because I never throw away that extra wax that doesn't burn off from my candles. I already had some string and wood wicks and lots of wax to melt down. I also keep a few of the large glass jars for melting the wax in.
Do you have a candle warmer already? If not, I highly recommend one! They make melting wax so much simpler than other methods. I just break up the wax into a glass jar, put it on the warmer and wait.
Rather than pouring the melted wax in all at once to fill the jar, pour in a little at a time, allowing it to cool before adding more; otherwise, the center of the wax will sink in and you won't have a nice smooth surface.
I was very happy with how they turned out; they looked even better than I had expected! Can you tell that I tried to make candle colors to look like tea/coffee?
And of course, the teacups went perfectly with all the other decorations; thanks to Pinterest.

Congratulations to my baby brother and his bride to be!


Friday, April 4, 2014

Ribbon Egg Towels

I think this is the fastest I've ever gone from pinning a project on Pinterest to finishing my own copy of it...

I found this beautiful ribbon egg towel DIY tutorial, from Addicted 2 DIY by Katie, just two days ago and knew I had to make my own!

Katie has a great tutorial over at her blog; so I recommend you check it out here, if you want to make one with step-by-step directions

I already had some pretty velvet ribbon that I had just purchased from an Etsy shop and I thought it would be perfect; so I just had to go buy some towels. (I got the plain white one from Target for $3 and the other one from Walmart for $2.99.)
And since I don't have a cricut or printer, I used an Easter egg cookie cutter for the shape/size.

~Please note that if you use velvet ribbon, it can be ruined from an iron. Since that's what I was using, I had to lay the ribbon upside down, then the Heat-n-Bond, then the towel, and iron from the backside.

These towels are technically done, but I wanted to add a quick stitch around the edge of the whole egg, just to keep it all on a little better.

This is such a cute, easy, and inexpensive way to decorate for Easter! Or a great gift for someone! I'm already planning on using the same idea to make some Christmas Tree towels (but I don't want to think about winter right now...).


Saturday, December 14, 2013

Candy Christmas Tree

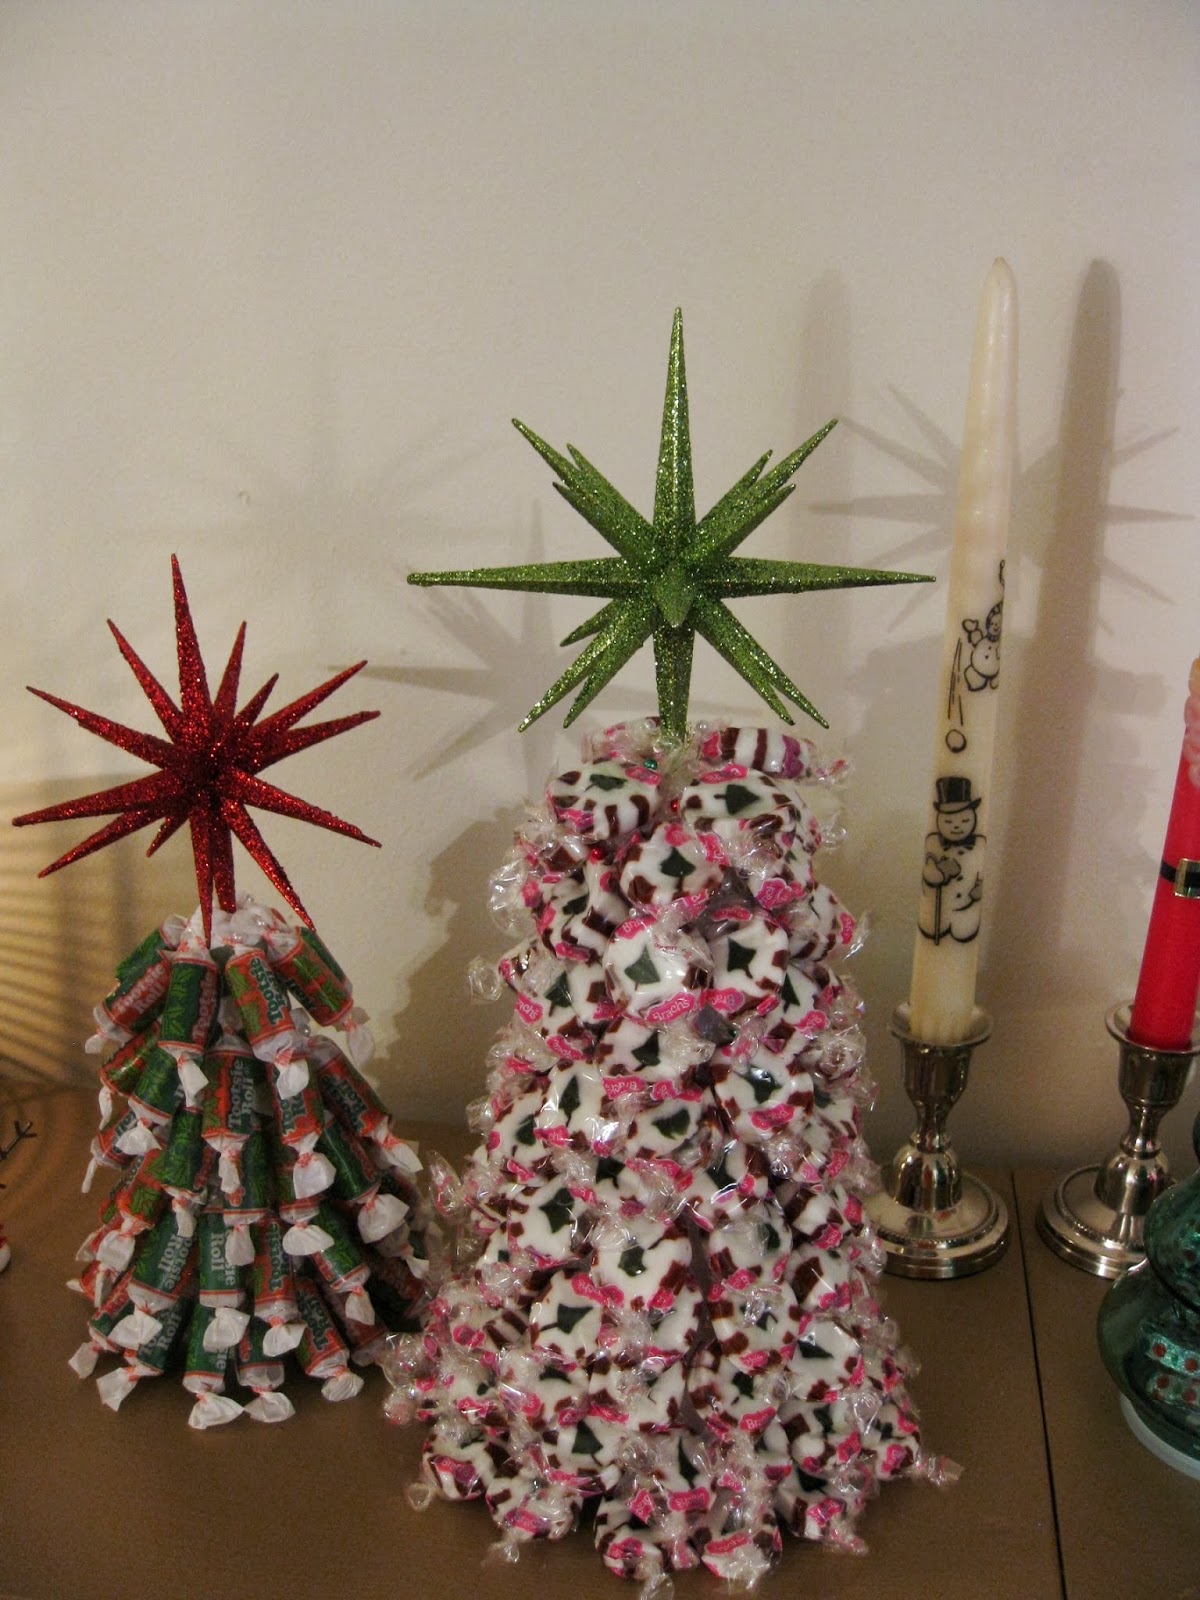
So, I told you all about the candy wreaths I like to make, but this year I decided to try something even easier - candy Christmas trees. Buy the styrofoam cones from your craft store and use sewing/floral pins to secure candy pieces. I thought it would be super easy, fun, and cute! I found the awesome star ornaments to use as a tree topper at Target.

A "sweet" holiday decoration!

Sunday, December 1, 2013

Candy Wreaths


I remember making these candy wreaths as a kid. 

I think my Mom found the idea and instructions in a magazine and just loved it. I love it too! Several years went by with this craft forgotten, until a few years ago when I saw the instructions in magazine (familiar story...).

And I have made a few every year since!


These candy wreaths make a wonderful holiday gift. I made the one at the very top and center for my boyfriend's family a couple years ago and took it as a gift at Thanksgiving. In fact, his mom liked it so much, she told the grandkids they weren't allowed to eat it. Three years later, it's still hanging up un-touched!

Actually, they're great gifts outside the holidays too. I made this one for my sister when she started teaching in a new classroom. The students and other teachers loved it!

For the base of the wreath, you can buy metal rings at JoAnn stores for under a couple dollars, depending on the size, but even a small one uses a lot of candy. Or you can dig through your parents' closets for some old wire hangers; which is what I was doing until I couldn't find anymore. If you use the hangers, you have to take them apart and create your own circle. The whole hanger will make a pretty large wreath, but not quite large enough to make two smaller ones. I definitely think the metal rings are easier and sturdier; and they aren't that expensive. Although, using the wire hangers I was able to make some awesome candy canes.


Once you've got your base, you'll need lots of candy. I have often bought what I thought would be enough, only to have to go back out for more. I always buy the wrapped candy that twists open on both ends. Then I use floral wire to wrap around one end of a piece of candy and onto the ring (or hanger).

There are several different tutorials on how to make these. I just did a Google search for "candy wreath tutorial" and found three different ways to tie on the candy. Mine is a little different still, but I may be trying out the other ways to see what's easiest.
I have always used floral wire without cutting it til the end. I start by wrapping the floral wire around the ring several times, overlapping itself so that it doesn't just pull off. Then I wrap the wire around one end of the candy wrapper three times; it tends to unwrap itself a little as you go.
I continue wrapping the wire around candy about an inch apart until I have about a foot of wire and candy; any more than that and it usually starts to tangle or is just harder to manage. Take that section and wrap it around the ring, pushing it together to make a nice full wreath.
Keep adding candy and wrapping until it's nice and full. Then wrap the floral wire back over some of the candy to secure it again.
I usually make my own bows with ribbon, but in the picture to the right I used a pre-made bow with a gift tag and added some tiny ornaments around the wreath.

And if you don't have anywhere to hang a wreath, they also make a great candle wreath!


If these aren't already a part of your gifting traditions, now is the perfect time to start.
Happy crafting and I hope you all have a wonderful holiday season!