Tuesday, October 21, 2014

Fall Leaf Pillow

I love my Christmas Tree Pillow (if you haven't seen it, you should check out the link); and while I was making it last year, I got the idea to make this leaf pillow. I love the colors of fall leaves, love seeing them fall from the trees, love hearing them crunch beneath my feet, so I thought I should bring some of that inside this year...


One of the things I loved about this craft is that I didn't have to go out and buy any material - I had it all from different sewing projects that I've done, or plan to do. It was a great project to start a couple days ago when the weather was too "bleh" to be outside.
This is done very similarly to the Christmas Tree Pillows, so if you like, take a look at that post first.

I used cookie cutters to get the shape of the larger leaves! And drew my own stencil for the small ones. Apply Heat-n-Bond (iron-on transfer paper) to the material before cutting out the leaves - this will help the material to fray less around the edges. You can trace the leaf shape before of after the heat-n-bond; I did it both ways so that the leaves wouldn't all be the same direction.

After I had cut out each leaf, I started playing with an arrangement, but I left the backing paper on until I was ready to iron the leaves onto the pillow case.

>> If you like super-easy, no-sew projects, grab a pillow case or plain pillow and iron away!

Since I wanted a pillow case to fit the same pillow as my Christmas Tree Pillow, I was going to have to measure and sew it.

I bought this beautiful flannel material months ago from the remnants bin at Joann Fabric's. I've been on a flannel-buying-kick for over a year now to make lots of baby gifts (see the Baby Crafts link at the top of the page). For some reason though, I haven't been able to pair this flannel up with too many baby prints. Lucky day for me - I had just enough of the fabric for this pillow case!
I like the easy, 3-piece pillow case - fold open the back and slide the pillow in. It's probably the second easiest way to make a pillow case (the easiest being just two pieces and leaving the side open). First, measure and cut a piece for the front, then cut another piece the same height, but a few inches longer. The long piece gets cut in half with the inside edges hemmed to create the back flap - there should be an inch or more overlap so that there's no gap once the pillow is stuffed inside. Pin it all together inside out, sew around all four sides, then turn it right-side out.
The back flap is a little loose on mine, so I'm thinking about grabbing some leaf buttons to hold it in place, but I'm not sure about doing button holes...

Once the case was done, I ironed it flat and began positioning and ironing-on the leaves.

As it came together, I decided to make a couple more small leaves to fill in a few spots. I wanted it to look like the leaves were falling down into a little pile, without overlapping the leaves too much that they wouldn't stand out by themselves. I think it turned out perfectly!

It's a bright, beautiful fall day inside no matter how cold it's getting outside. And after Thanksgiving, I can take this pillow case off and put on the Christmas tree pillow case


Do you think you'd make one? Would you keep it or gift it?

If you love this, let me know; I'd love to see what you make!


Saturday, October 18, 2014

Canvas Art

A cold and cloudy day, today was a great day to craft. It's also the last day of my 10 day vacation (were you wondering how I've posted so much) and I wanted to get the most out of it. I finished this canvas I had started a couple weeks ago and started a fall leaf pillow (it's the next post!).


I saw this canvas art idea and loved it, but it took me a while to find paper that had the colors I wanted to use. Finally, I found a book of scrapbook paper on clearance that was perfect. My sister had bought me the beautiful lamp as a Christmas gift and it's in my living room. I love yellow, but there wasn't anything else in the room that color. The scrapbook paper is a perfect match!


I used a protractor (you remember those things you used in math class?) to create the perfect petals, then cut out different sizes.

The 8x8 canvas was already painted black, so all I had to do was glue the paper onto the canvas.

I started out using a glue stick, but the paper started peeling off; so I went out and bought some crafting glue. I would think that a hot glue gun or rubber cement would also work. 


Once the glue was dry, it was ready for display!


ta-da!


For some other ways to make this-- 

A friend of mine made one by gluing the paper flower pieces to a large piece of paper and framing it - easy and just as pretty! 

Or, if you are familiar with decoupage, you could try creating the flower on a piece of wood!


Friday, October 17, 2014

Zucchini Banana Muffins

[This post is typed in pink in support of October being Breast Cancer Awareness Month.]

Last summer I couldn't pin enough new zucchini recipes to keep up with my zucchini plants. This summer, I was getting zucchini from my sister, since my plants didn't do well at all. This is a wonderful recipe that I pinned from Jessica at "How Sweet It Is". Her blog is absolutely gorgeous, full of pictures that I don't even think to take when I'm baking (and I love taking pictures of food)!
This is my second time making these delicious, healthy muffins and I ended up adapting the recipe a bit this batch. I did some substitutions and additions and they came out great. I'm sharing the recipe that I ended up baking and the one picture I took.
But seriously, check out Jessica's blog and tasty pictures!
Whole Wheat Zucchini Banana Chocolate Chip Muffins | How Sweet It Is

If I were to put all the main ingredients in the title of this recipe, I would have to call them:
Whole Wheat Zucchini Banana Applesauce Walnut Chocolate Chip Muffins.


     3 c. whole wheat flour
     1 c. all purpose flour
     2 tsp. baking soda
     1/2 tsp. cinnamon
     1/2 tsp. salt
     
     2 large eggs
     2/3 c. packed brown sugar
     2/3 c. milk 
     1 Tbsp. vanilla extract 
     1/2 c. butter, softened (one stick)

     1 1/2 c. zucchini, grated (do not squeeze dry)
     2 small-medium bananas, mashed
     1 c. applesauce

     1 c. crushed walnuts
     1 c. chocolate chips

Mix the first 5 dry ingredients together and set aside.
In a large bowl, beat eggs and brown sugar until smooth. Add in milk, vanilla, and butter; mix until smooth. Stir in zucchini, bananas, and applesauce. Slowly, mix in the dry ingredients. Then add desired amount of walnuts and/or chocolate chips.
The zucchini and fruit measurements are an approximation of what I mixed in. If the batter appears thick or clumpy (mine did the first time I made it because I had packed the zucchini too much in the measuring cup), you can add more applesauce or milk til you see the right consistency. Applesauce is often used as a substitute for oil, so it will make the muffins more moist. If it seems too 'soupy' add a little more flour.
Line muffin tins with liners and fill about 2/3 - 3/4 full with batter.
Bake at 350°F for about 17 minutes or until golden brown and toothpick comes out clean.
Let muffins cool completely before eating.

These muffins make a quick, healthy breakfast. The recipe made about 30  muffins and I froze most of them so I can just grab a couple on my way to work when I don't have time for anything else.

Play with the ingredients to find what you like best - I've made similar muffins that also had carrots and raisins in them and couldn't believe how amazing they were packed with healthy foods! If you want some more zucchini recipes, check out my pinterest board "Eat It!"


Tuesday, October 14, 2014

Wedding Cake

When my brother got engaged, he and his fiancee knew they had some fast planning to do - about 6 months! They were fine with a simple wedding and small reception. They asked me if I would make them a cake just so they had something to cut - not big enough for the 100 or so guests. I had made a tiered cake last year for my sister's baby shower, so I figured I could do the same size for the wedding.

As promised, I'm now sharing the pictures --
It took us a while to all agree on something. She wanted sunflowers, but for it to all be edible (so no real or silk flowers on the cake). He wanted didn't want anything too elegant, but with swirls or paisley that would go with the print on the groomsmen's vests. It had to be a two-layer round cake (because that's what I had the pans for). We pinned and reviewed a lot of wedding cake pictures.

About a month before the wedding, I did a practice run (picture at the top). I just baked two 6 inch rounds and did what the top layer of the cake would look like.
I certainly can't make two identical cakes, and I hate to say it, but I liked the practice cake quite a bit better than the final cake. Although, everyone at the wedding saw only the final cake and I received many compliments. The final cake was still very pretty.

I used two layers of 9 inch cakes and two layers or 6 inch cakes, all chocolate as per the bride's request.
I don't make cakes from scratch very often; a box mix works and tastes just fine to me. The icing was also purchased from a store. (Normally, I would make my own icing, but I wanted a little more time and less stress.)


I've never worked with fondant, so I wasn't going to start now. However, it takes a lot of practice and patience to get icing smooth and I wanted it as smooth as could get it. And when I'm icing a cake, I have to remember that a lot of things will be covered by the decorations on the cake and even if they aren't covered, as a whole, most of the 'less smooth' areas won't be noticeable by anyone other than me.
I iced the tiers separately, each with a cardboard base; then I [carefully] plopped the top layer on.
My sister asked me how long from start to finish the cake would take me, trying to get an idea of why special cakes cost as much as they do -- I estimated 4 hours. With the cake mixing, baking, cooling, cutting the tops flat, color mixing, and decorating, I think it took me longer than that. The decorating alone (after what you see in the picture above) took a little over two hours. A professional, or someone who makes special cakes a lot more often than I do, would probably be quite a bit faster.
But it all paid off (no pun intended, the cake was a gift from me).


And they loved it too --

For my baby brother and his wife:

all my love and best wishes for a marriage that is

as beautiful and happy as your wedding day!


Monday, October 13, 2014

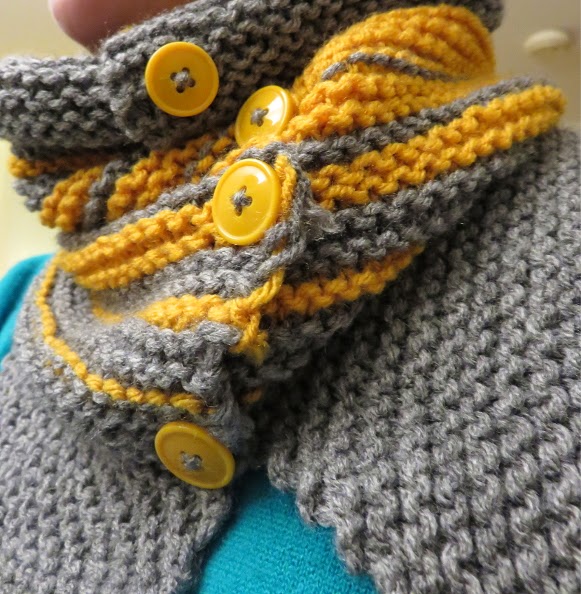
Knit Scarf #2

Fall is a great time to make a new scarf - I just finished another knit scarf today!

I just love the buttons on it for accent, don't you? 


If you'd like to make one for yourself, it's very simple (assuming you already know how to knit). I just did the regular knit stitch for the whole thing. 


Using size 10 needles, I started with 100 stitches, not quite sure how many I would need to fit it around my neck. After knitting five rows, I realized that it was wider than I needed, so I started casting off a stitch at the beginning of each new row. Once I had cast off 20 stitches, it looked about right. Casting off the stitches at the beginning of each row also created a 'bunting' tip look. I knit three more rows with 80 stitches before adding in the yellow yarn.


So, I had 28 rows of grey and started the fading sequence by rows:

1 yellow, 5 grey, 2 yellow, 4 grey, 4 yellow, 2 grey, 5 yellow, 1 grey.


If you are knitting this now, you should be able to see a 'front' vs. 'back' side by this point.


I knit 12 rows of yellow before reversing the sequence to fade back into grey.

(This may look familiar if you saw the photo in a previous post of the blanket that I knit.)


Once I had knit the last 5 rows of yellow, I knit a final 13 rows of grey and began casting off for a 'fourteenth' row.


Finally, I bought some buttons to match and overlapped the sides just enough to attach the buttons and create a tube.


Not too hard, right? Please feel free to comment with any questions. You may want to adjust the number of stitches or rows depending on what size will work for you.


I love the colors for fall and it's an extra layer of warmth for the coming cold! 

Wednesday, October 1, 2014

Crock Pot Applesauce

I read somewhere that apples are fall's favorite fruit. 
I personally have a lot of "fall favorites" - it's the season with some of my favorite memories from growing up. One of those memories is of apple picking with my family. (I shared a great photo from 20 years ago on a previous entry - if you missed it, check it out in Tomato Sauce.) 
This year, it was just me and a friend, but I just wanted to pick apples for the tradition and enough to make some tasty crock pot applesauce! Of course I picked a few extra for eating; a few more for some apple crisp; oh, and a couple more for some amazing bread... and then a coworker shared a recipe for apple brownies (I know, what?! But they were delicious, more like a coffee cake than brownie). 
Oh, the unending choices of what to do with apples! Until work gets in the way...

Back to the applesauce...
I found a recipe on Pinterest (really, where else would I look?) for crock pot applesauce and while I don't find stove-top applesauce extremely difficult, I liked the idea of using a crock pot so that I didn't feel like I'd have to check on it as often.
The recipe is from another blogspot blogger at Mommy Makes it Better: Crock Pot Applesauce


Like any good cook, I adapted the recipe a little. Essentially, I peeled and cut up enough apples to fill my crock pot; and I added some frozen peaches and strawberries. Then I added about a teaspoon of lemon juice, five teaspoons of brown sugar, and sprinkled cinnamon over the top.


Place the crock pot on "low" and let it simmer about 6-8 hours, stirring occasionally.
Once it looks like applesauce, mash the larger chunks or use a blender if you like less chunky.

I found that adding the strawberries made it a little more tart, but you can always add sugar and/or cinnamon to taste after the applesauce is done.


This made about one and a half quarts; which I've got in my refrigerator ready to take to work every day!

Think you'll try this recipe? Let me know!
Have another favorite apple recipe? Feel free to share; I'd love to try it!