Showing posts with label flowers. Show all posts

Wednesday, September 23, 2015

Autumn Wreath


I know I've proclaimed my love for the fall season numerous times, but every year I just get so excited for it! This year, the warm weather seems to be holding out... still, today it's officially fall and I was ready to get some decorations out.


A couple years ago, I made my first wreath and blogged about it here.   [In fact, it was two years ago, yesterday, and my first blog post! Happy two year anniversary saruthdesigns!]   Well, that wreath got me through two fall seasons, but when I took it down last year, it was definitely weathered.

This year, I got to make a new wreath and I was super excited about it! I don't remember where I found it (a thrift store, probably), but I had this huge grapevine wreath (you could always purchase them at Joann's) that I couldn't wait to decorate with silk leaves and sunflowers. I went out to my local Joann store and bought a few more silk sunflowers and the beautiful burlap ribbon to make a bow with.


The wreath was so gorgeous with just the leaves and sunflowers tied in!

I debated for a bit whether to add a bow or not, but in the end, I loved the ribbon so much that I had to make one.
I tried several different ways of making a bow before I realized that it's really so much easier to just cut the pieces and glue them - you get the perfect bow every time.
  

I was pleased with how the bow turned out, definitely adding to the eye appeal of the wreath as a whole. I added in a few more strands of ribbon to bring it all together.

Happy Fall Y'all!


Tuesday, November 18, 2014

Picture Frame Makeover #2

Here's a great before and after project! 

First, a little background -
I love Kohl's; everything about it. I have a Kohl's credit card; and with my statements I often get coupons. One of these coupons was for a free 16x20 print through Shutterfly (score!). Picking out one of my photos proved to be the hard part, but I settled on a close up of a poppy from my dad's backyard and placed my order.

I thought if I could find a thick, purple frame that it would match nicely with the center color of the poppy and make the orange petals pop. However, I had no luck finding what I was hoping for in stores. After scouring the internet, I found exactly what I wanted... for upwards of $50, plus more to ship it. That was a bit more than I was willing to pay, but it got me thinking, maybe I could make my own.


I found this frame at a thrift store, complete with an Anne Geddes poster (that I won't be keeping), for just $2.99! It had a plastic pane that had a crack, but I knew it could be exactly what I wanted once I dressed it up. I found another 16x20 frame with a glass pane that could replace the ugly plastic, for another $2.99. (So now I'm at $5.98 total.)

I was set on having a purple frame; so, immediately following this purchase, I headed over to Lowe's and picked out several purple paint samples. 


Upon arriving home (I'm not sure I even took my coat off, I was so excited), I proceeded to match up the colors with the photo, viewing them under different lighting to make sure the final choice was perfect. I settled on "Royal Plum" by Olympic.
I had to wait til the next day to get the $2.98, 7 oz. sampler of paint. (Total cost now at $8.96 and I'll have a bit of extra paint for other projects.)


With two coats of paint and a little sanding to create a weathered look, I had pretty much the exact frame I had wanted with a whole lot of savings!


Isn't it perfect? I think so! 


I love a great makeover craft; are there any gems you've found at a thrift store and made your own? I'd love to see your story!


Saturday, October 18, 2014

Canvas Art

A cold and cloudy day, today was a great day to craft. It's also the last day of my 10 day vacation (were you wondering how I've posted so much) and I wanted to get the most out of it. I finished this canvas I had started a couple weeks ago and started a fall leaf pillow (it's the next post!).


I saw this canvas art idea and loved it, but it took me a while to find paper that had the colors I wanted to use. Finally, I found a book of scrapbook paper on clearance that was perfect. My sister had bought me the beautiful lamp as a Christmas gift and it's in my living room. I love yellow, but there wasn't anything else in the room that color. The scrapbook paper is a perfect match!


I used a protractor (you remember those things you used in math class?) to create the perfect petals, then cut out different sizes.

The 8x8 canvas was already painted black, so all I had to do was glue the paper onto the canvas.

I started out using a glue stick, but the paper started peeling off; so I went out and bought some crafting glue. I would think that a hot glue gun or rubber cement would also work. 


Once the glue was dry, it was ready for display!


ta-da!


For some other ways to make this-- 

A friend of mine made one by gluing the paper flower pieces to a large piece of paper and framing it - easy and just as pretty! 

Or, if you are familiar with decoupage, you could try creating the flower on a piece of wood!


Wednesday, August 27, 2014

Cake Decorating

I've gotten a lot of use out of my cake decorating skills this summer! Starting with my own birthday cake, I've also made cupcakes for my nephew's first birthday, my sister-in-law's wedding shower, and my sister's birthday! In the next two months, I'll be making a practice run and the actual wedding cake for my brother's wedding. It's nice to enjoy something like cake decorating.


I started learning cake decorating when I got a job with Wegmans' Bakery in 2008. It is definitely a skill that takes a lot of practice and for a while, I wasn't sure I was going to be able to make roses.
Once I became more familiar with decorating, I really started loving it.
The first cake I made outside of work was for my brother's graduation party in 2009 - the same brother whose wedding cake I'll be making in October. Since then, I've make a lot of cakes for special occasions, or just because. Pictured are some of my favorites.

With all the summer heat, cake icing tends to melt, fast. I had wanted to make a tiered cake for my birthday from an idea I saw on Pinterest (of course); however, not having air conditioning, the icing between the layers was too soft and made the cake slide. I ended up making this cake instead and it was still beautiful.


For the rest of the summer events we had planned, I decided to make some fun and fancy cupcakes.
I don't have a step-by-step pictorial, but I'll share what tips to use and a couple links that I found helpful. If you've never worked with decorating tips or just want more instructions, check out wilton.comYou can also check out my Pinterest board for lots of links.


Interestingly enough, the cupcakes, in order of each event, also go up in level of difficulty.

Nephew's 1st Birthday Sunshine Cake

This sunshine cake was made with a 9" round pan and regular sized cupcakes.
To make the cupcake icing swirl with colors, I divided red, orange, and yellow icing into the decorating bag.
(Icing cupcakes - http://www.wilton.com/technique/1M-Swirl)
I used a small star tip to make the 1 on the cake.


Tea Party Wedding Shower Flower Cupcakes

Lots of pretty flower cupcakes are perfect for an outdoor tea party!

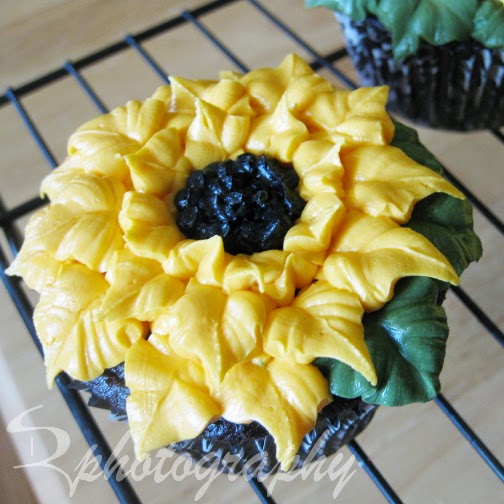
I used my large rose tip #125 for the roses and the poppies, a leaf tip (#366 or cut the bag to look similar) for the sunflowers, and a 2D star tip for the hydrangeas.

Click here for the rose technique - instead of icing on the nail, pipe the rose right onto the cupcake.

I followed Martha Stewart's technique for the poppies; again, just piping right onto the cupcake. (I did not refrigerate them.)

To make sunflowers, use the leaf tip and work your way from the outside; creating smaller circles and petals.

Here is a great pictorial on how to do the hydrangeas. It also has a picture for mixing colors in a bag (like I did for the sunshine cupcakes).


Alice in Wonderland Birthday "Painting the Roses Red" Cupcakes

My sister has always loved "Alice in Wonderland" and the thought of doing a themed party. For her 30th birthday this year she finally planned the theme. She asked if I would be able to make cupcakes with white roses that looked like they have been painted red.
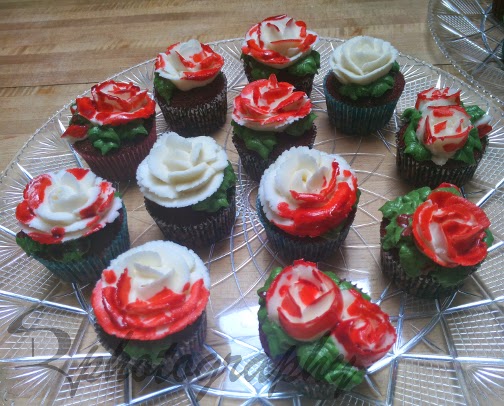
I figured that I could actually paint the red coloring onto a white rose for the effect, but it took a little experimenting. The icing for these roses had to be quite a bit thicker so that the flower stood up better and didn't 'wilt' when I put the paintbrush to it. The bright red coloring had to be watered down a little to help it spread better on the icing. And the combination actually made the roses still look wet - but watch out! it will stain if it gets on anything!

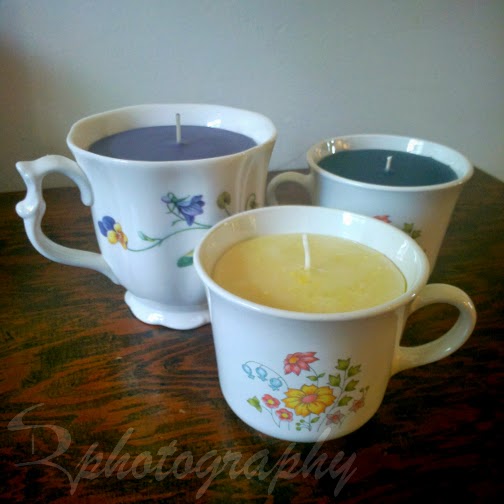
**Side note: remember the teacup candles that I made in July? I made some whimsical teacup candles to go with the Alice in Wonderland theme:


It's definitely been a fun and eventful summer. Now that it's winding down, I'm ready for fall - cooler weather, gorgeous colors, and pumpkin everything!
Don't forget to come back to see the wedding cake in October.


photo taken, at my request, by my sister; edited by me.

Monday, April 28, 2014

Flower Bed

Spring is a wonderful time to get dirty!


I have been patiently waiting for a day off with nice weather, so that I could dig up around my deck and plant the tiger lily bulbs that my dad pulled from his yard almost two weeks ago! Unfortunately, I wasn't having luck - the sun was shining when I was stuck inside at work and it was hidden behind clouds on my days off.
Today, I got out of work with plenty of sunshine left and I decided to get the job done! (I had NO idea how involved it was going to be...)
I didn't take a before picture, bummer, but here it is after I got the area cleared and dug out.

Notice the "bowling ball" rock at the bottom of the gutter drain? That was my biggest frustration to dig out! Never mind the countless smaller rocks (it seemed like the graveyard of rocks) or the 5-foot tall weeds, those were simple to remove compared to how long it took to get that big rock loose. Determined that it would be the last rock I needed to dig out, I kept at it.

After an hour and a half, I had a decent looking trench, without boulders, and I was ready to plant.
Thankfully, I had saved the dirt that I used in my container garden last summer and had two large totes of nice, rock-free dirt to put in around the bulbs.
I reused the brick edging that had previously been grown over and covered by the weeds to outline the area for the lilies and I am so pleased with all my hard work! (However my body, already hurting, is mildly regretting it.)

I'm very excited to see how they will bloom here! And will have to remember to add some pictures once they do.


**(The following photos were added during the summer of 2015. Some absolutely gorgeous lilies!)