Showing posts with label scarf. Show all posts

Saturday, November 28, 2015

Flannel & Lace Scarf

After my last Plaid & Lace Scarf (made from old shirts), I knew I wanted to make another one, but softer and bigger. I looked online and in-store for the perfect materials. Sure, it costs more than hitting up the thrift stores, but I got exactly what I was hoping for!


I bought 2 yards of the flannel fabric at fabric.com. I wanted to make sure I had enough for the length I needed to be able to wrap the scarf. I even have plenty extra that I might make a couple baby blankets with it.


The flannel is so soft and the colors are perfect for fall!
I cut out a piece approximately 9" x 72" to get the size scarf I was wanting.

I found the lacy material at Joann's; it wasn't exactly the 'lace' that I'd had in mind, but when I saw the stitching on it, it matched the plaid so nicely that I couldn't pass it up! Rather than buy another two yards of that, I just stitched two pieces together.


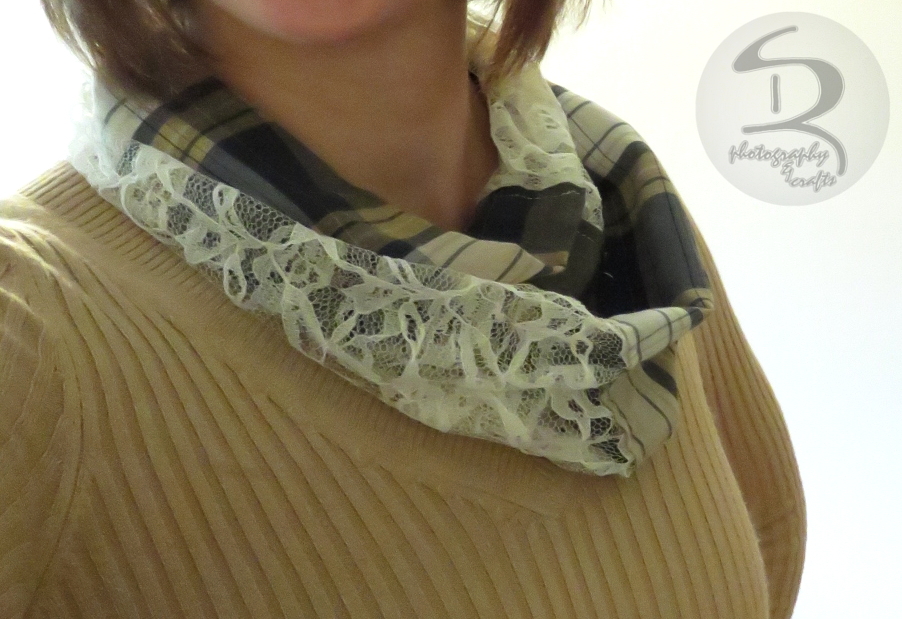
I sewed the flannel and lace into a long tube, gave it one twist, then sewed the ends together. The twist makes it so both materials show once I put the scarf on.

It could not have turned out more perfectly!

Thursday, October 1, 2015

Plaid & Lace Scarf

Fall is for scarves and boots... yep.

Although, I like knitting a good fall/winter scarf, this year I was inspired by some plaid/lace and plaid/polka dot scarves I found while browsing Pinterest.

Here's how my first one turned out!


I started out by visiting my area thrift stores, hoping to find some good flannel shirts for cheap and maybe some old lacy shirts, too. While I didn't find any flannel plaid, I didn't leave disappointed.
Just check out these fashionable shirts! (Ok, I honestly, kind of like the second one in... maybe because is actually fits. I might not cut it up after all...)


These prints are gonna be great for fall! 
(Can you see the detail on the navy blue one? It's got little stitched in dots.)


After having finished the first scarf, I know that I definitely want to make the next ones bigger. The shirts might have enough material, but I think I'll check out Joann's for some real flannel and more lace!

Still, from 80's shirts to today's scarf... I'm happy with it!

Thursday, January 22, 2015

Knit Scarf #3

So, I started this scarf back in October...
I know I've mentioned before about how long I can take to finish a project. This time, though, I wanted to try something other than a straight knit scarf (see the others I've made
here and here); and I wanted to make a real infinity scarf.


I found two beautiful skeins of yarn at my local Thrift Store for only 50¢ each! Since I'd already started thinking about knitting an infinity scarf, I couldn't resist the rich colors.

It's kind of funny how people relate knitting to Grandmas, but the more I talk about knitting, the more I find out my own friends knit! In fact, I got this idea in my head from a friend.
She was wearing a gorgeous, red scarf that I loved; after expressing my thoughts, she stated she knit it herself. I exclaimed how beautiful the ribbing was and she shrugged saying, "It's just knit 2, purl 2."

I had to watch a lot of YouTube videos to teach myself a bit more about knitting! I discovered that I had been doing a purl stitch very incorrectly - no wonder I had avoided it for so long - it really wasn't nearly as difficult as I had thought.

The yarn I had bought is a very fluffy, curly yarn and I couldn't see the results quickly to tell if I was knitting the rows correctly. I decided to just practice the ribbing on some regular yarn first, til I was confident.

Then I was distracted by other knitting tutorials on YouTube... and I practiced knitting a cable - 


This was all in the first night of starting my infinity scarf and I was determined to see the ribbing on the scarf before I went to bed. It took several rows and monotonous counting ("knit 2, purl 2, knit 2, purl 2...") until I saw that it was definitely ribbing. I was so excited that I shared this photo on Facebook -                               

Over the next couple days, I added in the second color, watched videos on how to carry up the color (so that I wasn't knotting it and cutting every time I switched back), and thought it was looking great!

For a couple weeks, I knit several rows a day, while watching movies or TV shows; but once I started decorating for the holidays, the needles and yarn moved into my craft room for hibernation.

Finally, I pulled the project back out and sat down to finish it! I bought another skein of the purple with a Christmas gift card I'd received; so I'm still saying this is my dollar scarf!


It's so soft and warm and comfy! I've worn it several times already - and needed it with the below zero temperatures we've had with wind chill!

I discovered a co-worker knitting something the other day during lunch break. When I asked, she said she was just starting a sweater!
We talked about knitting for a while and she left me with this, "Eventually, you'll get sick of doing just scarves and want to try something more challenging."
I can't say I'm quite there, but I did see a beautiful knit blanket on Pinterest that I see myself starting in the near future.

And you'll see a few new patterns I've pinned, if you check out my Pinterest board "Knit It!"
Follow Ruth's board Knit It! on Pinterest.

Thanks for reading!


Monday, October 13, 2014

Knit Scarf #2

Fall is a great time to make a new scarf - I just finished another knit scarf today!

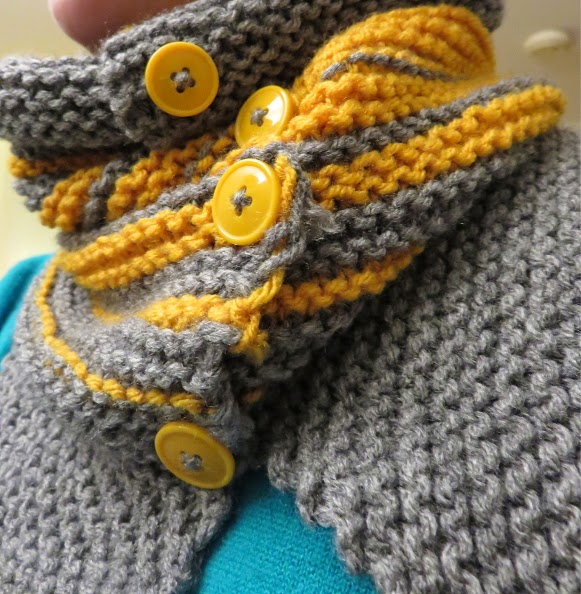
I just love the buttons on it for accent, don't you? 


If you'd like to make one for yourself, it's very simple (assuming you already know how to knit). I just did the regular knit stitch for the whole thing. 


Using size 10 needles, I started with 100 stitches, not quite sure how many I would need to fit it around my neck. After knitting five rows, I realized that it was wider than I needed, so I started casting off a stitch at the beginning of each new row. Once I had cast off 20 stitches, it looked about right. Casting off the stitches at the beginning of each row also created a 'bunting' tip look. I knit three more rows with 80 stitches before adding in the yellow yarn.


So, I had 28 rows of grey and started the fading sequence by rows:

1 yellow, 5 grey, 2 yellow, 4 grey, 4 yellow, 2 grey, 5 yellow, 1 grey.


If you are knitting this now, you should be able to see a 'front' vs. 'back' side by this point.


I knit 12 rows of yellow before reversing the sequence to fade back into grey.

(This may look familiar if you saw the photo in a previous post of the blanket that I knit.)


Once I had knit the last 5 rows of yellow, I knit a final 13 rows of grey and began casting off for a 'fourteenth' row.


Finally, I bought some buttons to match and overlapped the sides just enough to attach the buttons and create a tube.


Not too hard, right? Please feel free to comment with any questions. You may want to adjust the number of stitches or rows depending on what size will work for you.


I love the colors for fall and it's an extra layer of warmth for the coming cold! 

Wednesday, October 16, 2013

Knitting

My Grandmother taught me how to knit when I was young & somehow I never forgot how.

I really wouldn't say I'm good - I can do a regular or purl stitch and only into a rectangular shape; nothing fancy. My Grandma helped me start a project when I was less than 10 years old, that I thought was going to be a scarf for my dad, but I had little patience to stick it out. It got to be maybe a foot in length before I set it aside for something more interesting, and something that didn't hurt my fingers. 
Over the years, I would find the same ball of yarn with the needles stuck into it and tell myself that I should finish it. And I would sit and knit a few rows, maybe over several days, but my fingers would start hurting after a while and I'd put it away again.
I'd fit right into Gryffindor with these colors...

When I was 21, I moved into my first apartment (outside of college living) with my older sister and we decided to start our own "knitting club" to practice and see what we could do. 
It turned out we still weren't ambitious enough to learn anything fancy, but we practiced what we did know and I ended up making a blanket! (Not from the same ball of yarn my Grandma started for me, but it was the first knitting project I completed.) Of course there were things about the blanket that I could have done better; it ended up being a rather long and skinny blanket that I had to lay flat under and not move to stay covered. Nonetheless, I was quite pleased with myself for having finally finished something.

Knitting something big enough to cover an entire body takes a long time (just in case you didn't know). I thought of an idea to try knitting single squares and then stitch them together to create a knit quilt-like blanket. That way I could spend 20 minutes knitting a square that would be part of a large project, but still feel like I'd finished something.

I then found the same idea on pinterest and realized I wasn't the first person to come up with it.

Today, I'm even more impressed with myself for creating this scarf. Can't you tell by the look on my face?


I got the idea from all those infinity scarves lately. A friend of mine had knitted herself one last winter, so I thought I'd try. Mine's definitely a 'finite' scarf though; my boyfriend compared it to a dickie... I guess it is, kind of.
I started by casting on 44 stitches with the intent of only knitting til it was about 8 inches, then casting off and sewing the two shorter sides together - creating a scarf that I would just pull over my head. But 44 stitches wasn't going to make it around my neck without really stretching it. So I decided to add 12 stitches to each end to make it wider; and then I had the smaller part to fold over the top. That made it a little bit wider than I need, but it will still keep me warm.
Since "chevron" is a thing lately, I decided to try knitting in a zig-zag and I think it turned out pretty nice.